
# uni-icons 图标
用于展示 icon 图标 。
# 介绍
# 基本用法
<uni-icons type="contact" size="30"></uni-icons>
# 图标示例
点击复制图标类型
复制成功 arrow-down
复制成功 arrow-left
复制成功 arrow-right
复制成功 arrow-up
复制成功 down
复制成功 left
复制成功 right
复制成功 up
复制成功 auth
复制成功 auth-filled
复制成功 calendar
复制成功 calendar-filled
复制成功 camera
复制成功 camera-filled
复制成功 cart
复制成功 cart-filled
复制成功 chat
复制成功 chat-filled
复制成功 chatboxes
复制成功 chatboxes-filled
复制成功 chatbubble
复制成功 chatbubble-filled
复制成功 checkbox
复制成功 checkbox-filled
复制成功 circle
复制成功 circle-filled
复制成功 clear
复制成功 close
复制成功 checkmarkempty
复制成功 closeempty
复制成功 cloud-download
复制成功 cloud-download-filled
复制成功 cloud-upload
复制成功 cloud-upload-filled
复制成功 color
复制成功 color-filled
复制成功 contact
复制成功 contact-filled
复制成功 download
复制成功 download-filled
复制成功 email
复制成功 email-filled
复制成功 eye
复制成功 eye-filled
复制成功 eye-slash
复制成功 eye-slash-filled
复制成功 fire
复制成功 fire-filled
复制成功 flag
复制成功 flag-filled
复制成功 folder-add
复制成功 folder-add-filled
复制成功 gear
复制成功 gear-filled
复制成功 gift
复制成功 gift-filled
复制成功 hand-down
复制成功 hand-down-filled
复制成功 hand-up
复制成功 hand-up-filled
复制成功 heart
复制成功 heart-filled
复制成功 help
复制成功 help-filled
复制成功 home
复制成功 home-filled
复制成功 image
复制成功 image-filled
复制成功 images
复制成功 images-filled
复制成功 info
复制成功 info-filled
复制成功 location
复制成功 location-filled
复制成功 locked
复制成功 locked-filled
复制成功 mail-open
复制成功 mail-open-filled
复制成功 map
复制成功 map-filled
复制成功 map-pin
复制成功 map-pin-ellipse
复制成功 medal
复制成功 medal-filled
复制成功 mic
复制成功 mic-filled
复制成功 micoff
复制成功 micoff-filled
复制成功 minus
复制成功 minus-filled
复制成功 more
复制成功 more-filled
复制成功 navigate
复制成功 navigate-filled
复制成功 notification
复制成功 notification-filled
复制成功 paperplane
复制成功 paperplane-filled
复制成功 person
复制成功 person-filled
复制成功 personadd
复制成功 personadd-filled
复制成功 phone
复制成功 phone-filled
复制成功 plus
复制成功 plus-filled
复制成功 redo
复制成功 redo-filled
复制成功 refresh
复制成功 refresh-filled
复制成功 refreshempty
复制成功 reload
复制成功 settings
复制成功 settings-filled
复制成功 shop
复制成功 shop-filled
复制成功 smallcircle
复制成功 smallcircle-filled
复制成功 sound
复制成功 sound-filled
复制成功 staff
复制成功 staff-filled
复制成功 trash
复制成功 trash-filled
复制成功 tune
复制成功 tune-filled
复制成功 undo
复制成功 undo-filled
复制成功 upload
复制成功 upload-filled
复制成功 videocam
复制成功 videocam-filled
复制成功 vip
复制成功 vip-filled
复制成功 wallet
复制成功 wallet-filled
复制成功 back
复制成功 forward
复制成功 bars
复制成功 compose
复制成功 font
复制成功 headphones
复制成功 link
复制成功 list
复制成功 loop
复制成功 paperclip
复制成功 plusempty
复制成功 pulldown
复制成功 weixin
复制成功 weibo
复制成功 pyq
复制成功 qq
复制成功 scan
复制成功 search
复制成功 spinner-cycle
复制成功 star
复制成功 star-filled
复制成功 starhalf
# API
# Icons Props
| 属性名 | 类型 | 默认值 | 说明 |
|---|---|---|---|
| size | Number | 24 | 图标大小 |
| type | String | - | 图标图案,参考示例 |
| color | String | - | 图标颜色 |
customPrefix[即将废弃] | String | - | 自定义图标 |
| fontFamily | String | - | 自定义图标 2.0.0+支持 |
# Icons Events
| 事件名 | 说明 | 返回值 |
|---|---|---|
| @click | 点击 Icon 触发事件 | - |
# 通过 fontFamily 自定义图标
- 引入字体图标
- 页面
style中定义font-family属性,并正确引入字体
@font-face {
	font-family: CustomFont;
	src: url('./iconfont.ttf');
}
- 组件声明
fontFamily属性,值为 步骤2 的font-family,此时组件的type属性将不生效 - 组件内需要使用字体的
unicode码作为图标显示内容
<uni-icons fontFamily="CustomFont" :size="26">{{'\uebc6'}}</uni-icons>
- 方便使用扩展,推荐将
unicode与显示内容做一个map映射
<template>
<view class="icon-content">
<view v-for="(item,index) in customIcons" :key="index">
<uni-icons fontFamily="CustomFont" >{{item.unicode}}</uni-icons>
<text>{{item.name}}</text>
</view>
</view>
</template>
<script>
export default {
data() {
return {
icons: [],
customIcons: [
{
name: "home",
unicode: "\ue601",
},
{
name: "my",
unicode: "\ue6ba",
},
{
name: "back",
unicode: "\ue634",
}
]
}
},
created() {},
}
</script>
<style>
@font-face {
	font-family: CustomFont;
	src: url('./iconfont.ttf');
}
</style>
# 通过 customPrefix 自定义图标 (即将废弃)
注意
nvue 页面暂时不支持自定义图标,如需在 nvue 中使用 ,请自行引入字体文件
uni-icons 已经收录了日常开发中常用的图标 ,但是因为体积问题 ,不可能一直无限添加新图标 ,所以uni-icons 也提供了扩展的方法。
使用 custom-prefix 和 type 属性自定义图标
<uni-icons custom-prefix="custom-icon" type="icon-youxi" size="30"></uni-icons>
# 获取图标
以下所有说明都是基于阿里图标库进行扩展,其他图标库同理,明白原理即可方便扩展
访问 阿里图标库,搜索图标并加入购物车:
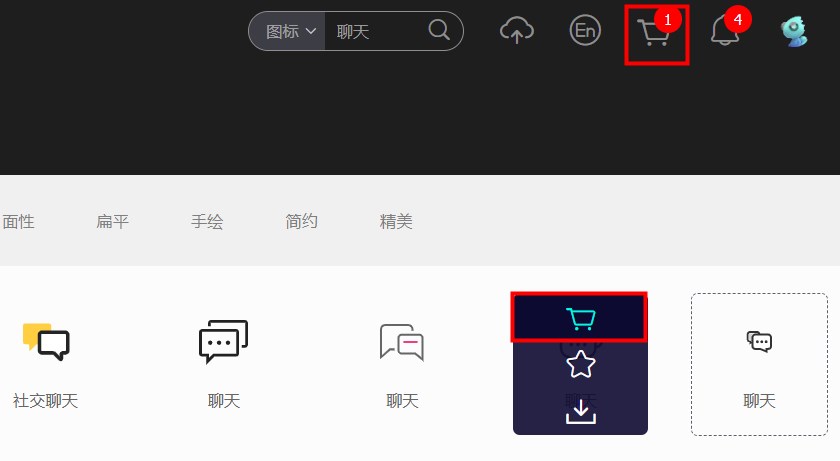
点击页面右上角购物车图标 ,点击
添加至项目,如没有项目,需要点击下图第二步的图标添加一个项目目录,如已经有项目则可以略过第二步,选择项目后点击确定:

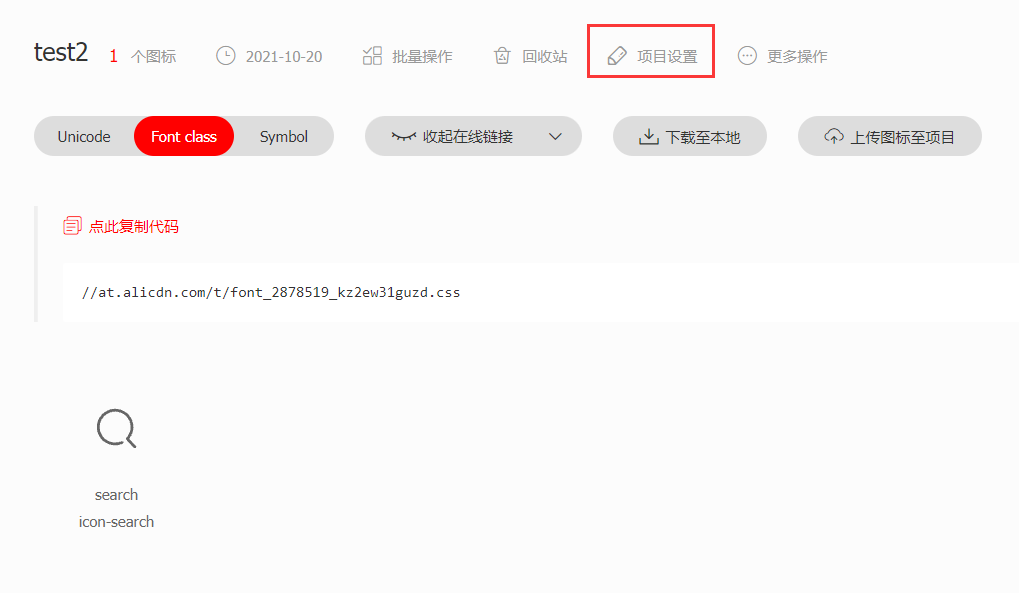
确定后进入项目,点击项目设置 ,对图标库进行一些设置:
项目名称和项目描述根据自己需求填写,
fontClass是图标的前缀 ,需要传入组件type属性,fontFamily是图标集名称,需要传入组件custom-prefix属性,字体格式可以只勾选ttf: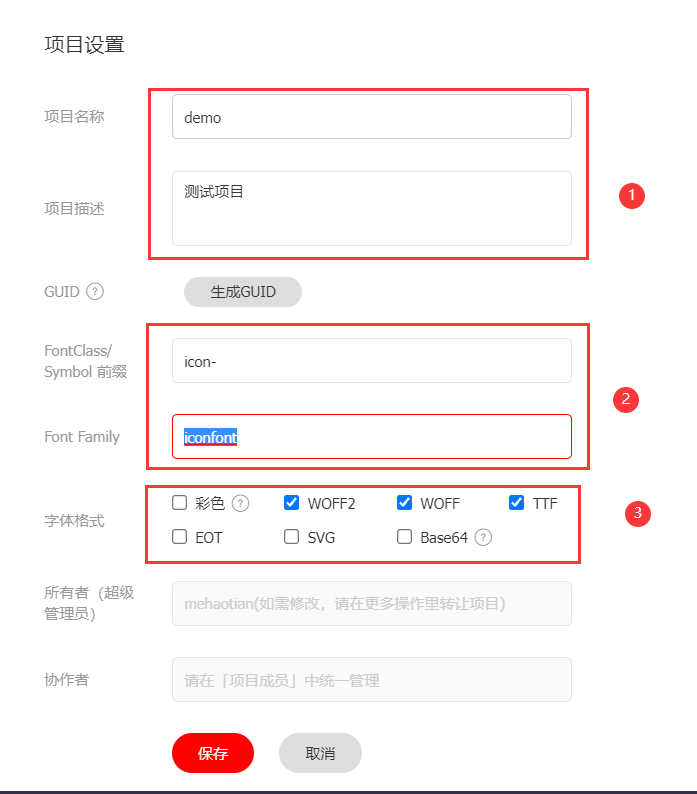
点击保存后 ,可以下载图库库到本地:
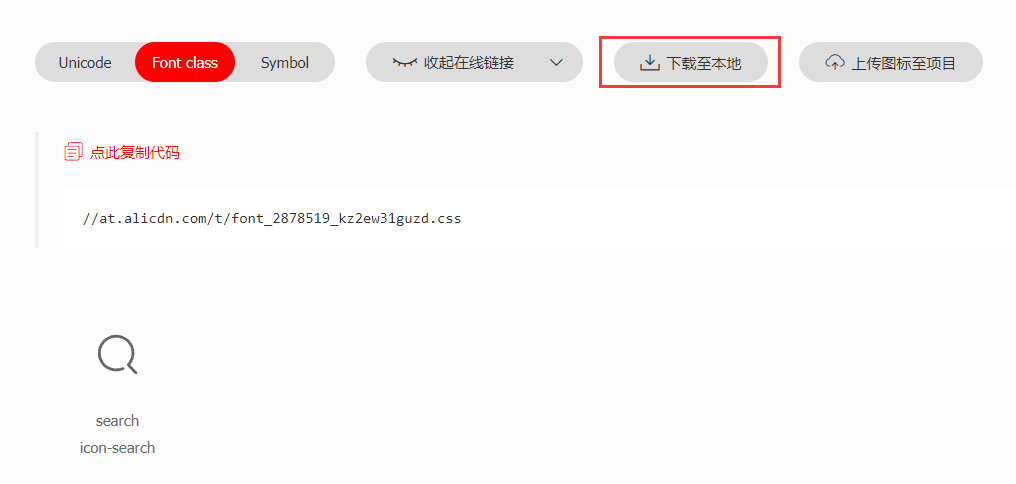
下载解压后,需要用到的文件暂时有两个
iconfont.css、iconfont.ttf: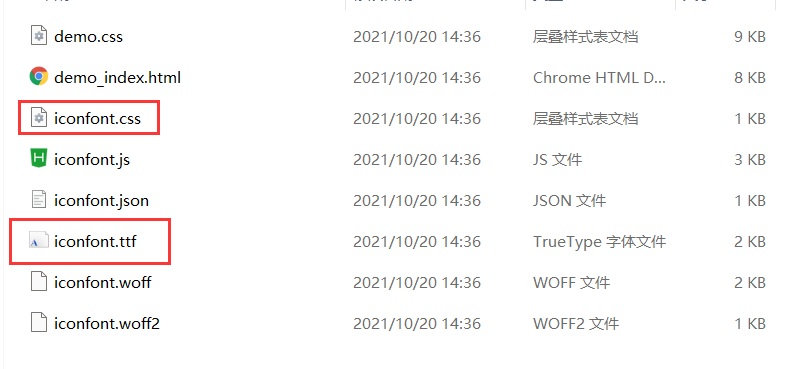
将
iconfont.ttf、iconfont.css放到项目根目录static下。打开
iconfont.css,修改@font-face如下,注意 src 字体文件的引用路径是否正确:@font-face { font-family: "iconfont"; src: url('/static/iconfont.ttf') format('truetype'); } .iconfont { font-family: "iconfont" !important; font-size: 16px; } .icon-search:before { content: "\e65c"; }
通过上述操作 ,现在就获得一个可以自定义的图标库,
# 在 vue 页面使用自定义图标
在项目根目录的 App.vue 中,引入上述的 iconfont.css,注意自己存放的路径,且通过 @import 引入的外部样式,需要写在 style 标签有效内容中的最前面
<!-- App.vue -->
<style>
@import "@/static/iconfont.css";
</style>
使用 custom-prefix 和 type 属性自定义图标
<uni-icons custom-prefix="iconfont" type="icon-search" size="30"></uni-icons>
注意:因为本质上还是使用的字体,所以多色图标还是不支持的。